• Home
  • MAKE
    • Free Sewing Patterns
    • Tutorials
    • Japanese Sewing Patterns
    • Sewing Pattern Review
    • Sew Alongs
    • Accessories
    • Crafts
    • Kids & Baby
    • Knitting
  • My House
  • LIFE
    • Rin’s Life
    • Recipes
    • Healthy Habits
    • Simple Joys
    • Blogging
  • Free Facebook Group
  • About
    • About Rin
    • Disclosure + Privacy Policy

Sew in Love

  • Home
  • MAKE
    • Free Sewing Patterns
    • Tutorials
    • Japanese Sewing Patterns
    • Sewing Pattern Review
    • Sew Alongs
    • Accessories
    • Crafts
    • Kids & Baby
    • Knitting
  • My House
  • LIFE
    • Rin’s Life
    • Recipes
    • Healthy Habits
    • Simple Joys
    • Blogging
  • Free Facebook Group
  • About
    • About Rin
    • Disclosure + Privacy Policy
  • {FREE} Sewing Patterns

  • {FREE} Boxy Dress Workshop

  • {FREE} Japanese Sewing Guide

LifestyleRin's Life

Kickstart the year with Sewing and Craft Goals for 2014

Happy new year! Are you setting new year’s resolutions for 2014? To aid my resolution to learn new skills, I’ve got five sewing and craft goals to achieve this year. I think writing goals down helps maintain focus and motivation. Oh, and posting your goals on the internet certainly can’t hurt to keep you in line!

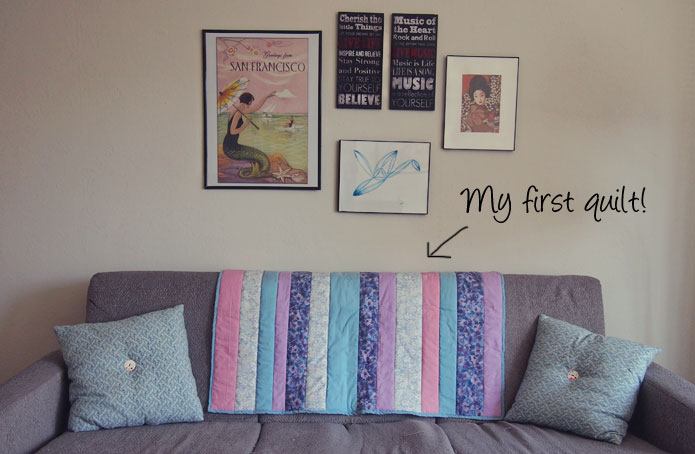
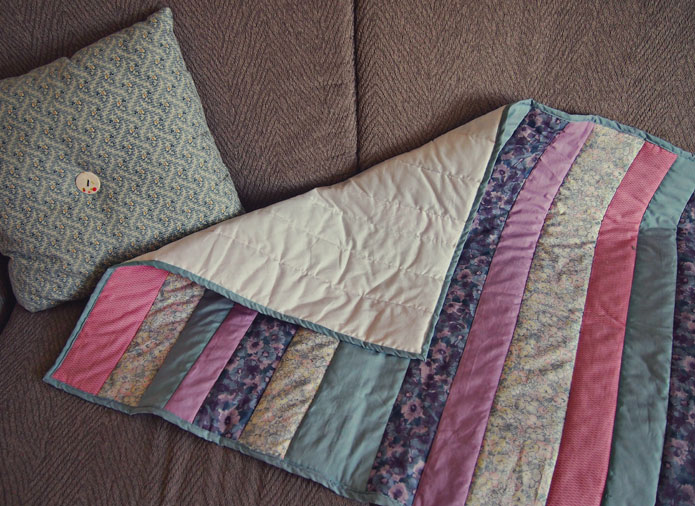
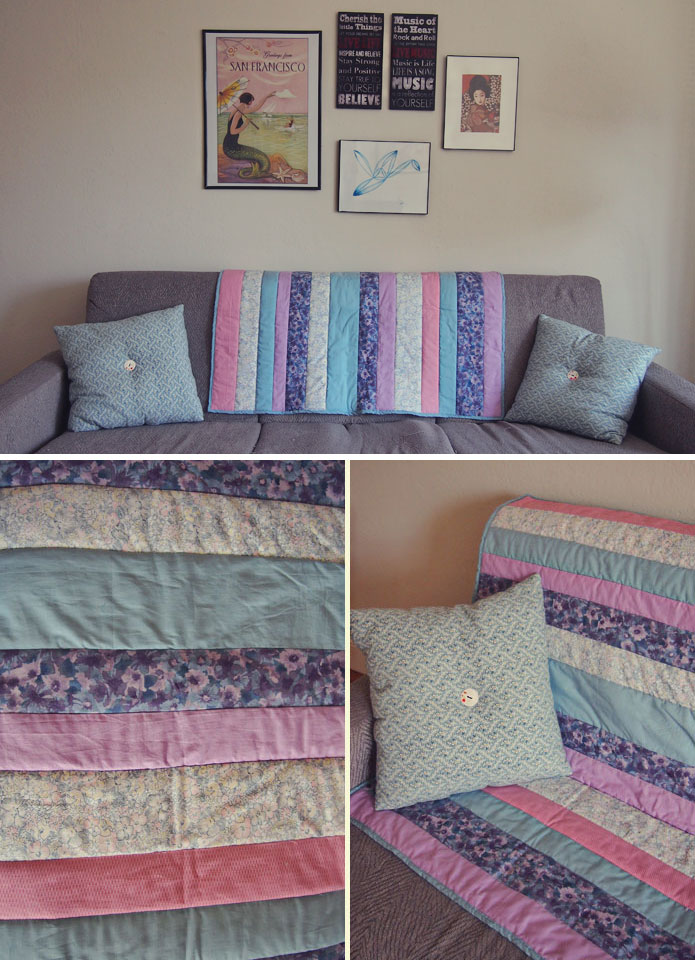
In 2013, I launched an e-book, knitted my first cardigan and made my first quilt, all while getting used to living in a new country. Hmm, maybe I could have done a lot more if I had written some goals down at the beginning of 2013?

New Year Goal 1: Learn to crochet

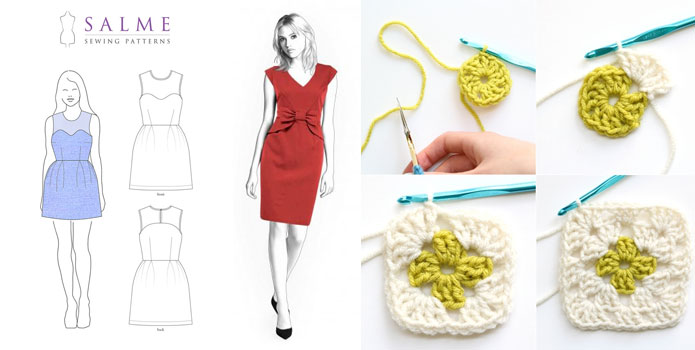
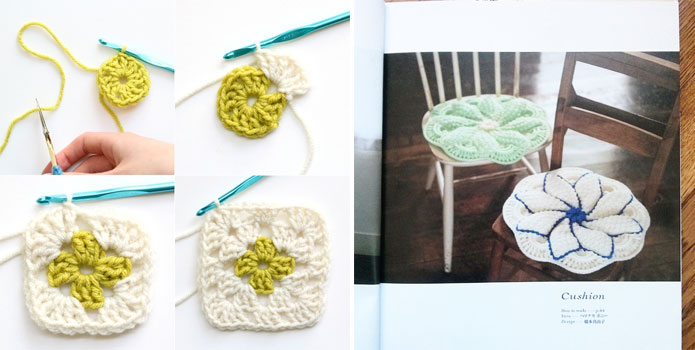
I’ve dabbled in crochet, but I’m yet to make anything worthy of being photographed. I think getting an even tension is easier with knitting than crochet. Maybe because you have two needles instead of one crochet hook? I would love to crochet One Sheepish Girl’s granny square coasters (below left) and floral chair cushions from the Japanese knitting book, Hand Knit Story Vol. 3 this year.

Crochet-granny-square-coaster-and-floral-chair-cushion


New Year Goal 2: Show knit fabric who is boss

Other than t-shirt modifications, I have been avoiding knit fabric at all cost. I’m a little scared of them I guess. This year, I’m going to face up to my fear of knit fabric and sew something. Maybe a dress from one of the Drape Drape series of Japanese sewing books…


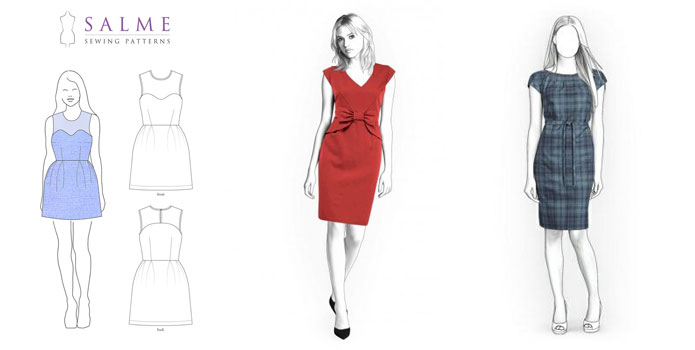
New Year Goal 3: Sew a fancy (office appropriate) shift dress

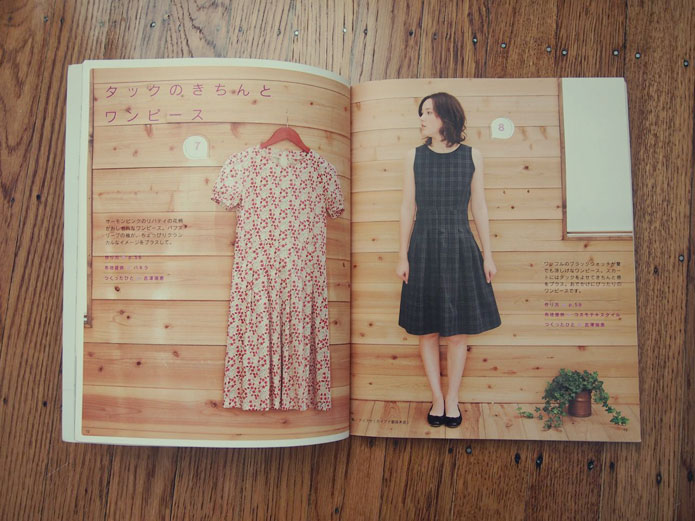
I do adore Japanese sewing patterns, but they tend to mainly consist of smock dresses, tunics or a babydoll type of unstructured garments. I want to sew a shift dress this year that is tailored, sleek and nipped in at the waist. On my sewing pattern wish list are (below, left to right): Yoke dress by SALME, Red bow belt shift dress by Lekala patterns and Cap sleeved safari dress by TipTopFit.

Shift-dress-for-work-sewing-patterns-online


New Year Goal 4: Master the Japanese embroidery, ‘sashiko’

Sashiko is a type of Japanese embroidery using even stitches to form a repeating pattern (I did a sashiko book review here). I’d love to practice more and eventually design my own sashiko embroidery patterns.


New Year Goal 5: Start a sewing YouTube channel

Whenever I’m stuck on a sewing or craft project, I find myself watching a tutorial on YouTube. It makes more sense than instructions or photos! That’s why I’m planning on venturing into the world of YouTube, with my own sewing tutorials and book reviews.


Sure, there’s other crafts I want to try, but five feels manageable. What are your sewing and craft goals for this brand new year?

Kickstart the year with Sewing and Craft Goals for 2014 was last modified: January 4th, 2014 by Rin
DIY FashionTutorial

Mens T-shirt DIY – Upside Down Pocket

Who says DIY t-shirt revamps are just for women? Pretty sure men appreciate an original, customized t-shirt too. Especially if it’s been made with lots of love!

This customized t-shirt was a Christmas gift for my husband. I used a traditional Indonesian batik fabric I bought in Jakarta last month. Husband is pretty chuffed to have a unique tee, especially with a bit of my Indonesian heritage thrown in.

How to make

Step 1

Create a paper pattern for the back panel by folding the t-shirt in half. Also draw and cut out a paper pattern for the pocket.

Mens-t-shirt-diy-upside-down-pocket-step-1-


Step 2

Cut out the back panel and pocket from your fabric. Add 1cm (0.4 in) seam allowance.

Mens-t-shirt-diy-upside-down-pocket-step-2-


Step 3

Let’s make the pocket! Zig-zag stitch around all edges to prevent fraying. Fold and press along the seam allowance, then stitch along the pointed edge. Stitch a little triangle on each side to keep the seams neat. Make a buttonhole.

Mens-t-shirt-diy-upside-down-pocket-step-3-


Step 4

Pin and stitch the pocket on to the t-shirt. Make sure you only stitch along the three straight edges! Attach a button to the t-shirt which meets the buttonhole on the pocket.

Mens-t-shirt-diy-upside-down-pocket-step-4-


Step 5

Attaching the back panel now. Fold and press along the seam allowance of all edges except for the neckline curve. Attach back panel to the t-shirt, stitching about 2mm (0.4 in) from the edge.

Mens-t-shirt-diy-upside-down-pocket-step-5-
Step 6

The neckline is a bit tricky. Trace the neckline curve on the right side of the fabric, before snipping along the curve. Press the snipped edges inside the fabric and sew 2mm (0.4 in) from the edge.

Mens-t-shirt-diy-upside-down-pocket-step-6


Finished!

Mens-t-shirt-diy-upside-down-pocket-Pinterest

Mens T-shirt DIY – Upside Down Pocket was last modified: December 31st, 2013 by Rin
Decorating

Easy quilt in a day for beginners: Quilt as you go!

This is my first quilt, ever! If you’re also a beginner, I highly recommend trying the quilt-as-you-go method. As the name suggests, it means you sew the backing, quilt wadding and the topper fabric all together at the same time. The result is a simple quilt in next to no time.

Easy-quilt-in-a-day-backing


Easy-quilt-in-a-day-close-up


The Tutorial

I followed the Missouri Quilt Company’s video tutorial, How to quilt as you go! available on YouTube.


For the binding, I followed another video my Missouri video, How to bind a quilt with a sewing machine. Jenny explains the steps clearly, and I like it even better that she repeats the complicated parts, SLOWLY.


Tips for beginners

Here’s some learnings from making my first ever quilt. I hope this helps you get started on your first quilting project!

  • Use a rotary cutter: I don’t have a rotary cutter (yet), and cutting the strips of fabric with scissors is a tedious task. It’s also far less accurate. I’m definitely investing in a rotary cutter before I attempt my next quilt.
  • Plan ahead: Once you have your strips of fabric, take some time trying different arrangements. I found I liked it better when the strips were random; not following a specific order. Take a picture of your final arrangement (I just used my phone) so you can refer to it later.
  • Explore different binding options: I wish I had looked at more binding tutorials before jumping into the machine method. It looks ok, but being my first time, I probably should have tried doing it by hand to get a neater finish.
  • Anne at Mama Says Sew has been teaching quilting for over 18 years, and her Anne’s Top Tips is free to download.

Easy-quilt-in-a-day-pinterest

Perfect for first time quilters: This is a quilt as you go quilt! You'll have a quilt in record time :)

Easy quilt in a day for beginners: Quilt as you go! was last modified: December 26th, 2013 by Rin
DIY FashionJapanese Sewing Patterns

How to make a peplum top from a dress sewing pattern – ペプラムトップス

I searched everywhere for a gold peplum top to wear to my cousin’s wedding in Indonesia. In the end, I realised I could make a nice, silk version myself using a sewing pattern I already owned.  No, I didn’t have a peplum top sewing pattern, but I used instead, a dress with a pleated skirt!

I used the sewing pattern from the Japanese book, Dresses I want to make everyday (I reviewed this book in a previous post). Find a fit and flare dress with a skirt that starts to flare immediately below the waistline. The waistband of this dress is cut quite high, so I only needed to shorten the skirt to create the “peplum” part of the top.

Gold-silk-pleated-peplum-top-japanese-sewing-pattern-from-dress

Japanese-sewing-pattern-book-for-dresses-everyday

Looking at pictures of peplum tops online, I decided I wanted the peplum to sit at my hips. All I had to do was shorten the skirt to 9 inches (22.86cm).

Gold-silk-pleated-peplum-top-sewing-pattern-side-view

I purchased the gold 100% silk taffeta on eBay for $30. It matched the green kimono fabric skirt my grandmother made for me perfectly (below is me at the wedding with my cousin from Sydney). The gold is very festive, so I’ve been wearing the top to holiday parties as well. A similar silk top would cost a lot more than just $30, so I’m pretty chuffed with the result.

Gold-silk-pleated-peplum-top-how-to-wear

Do you have any dress sewing patterns on hand that could become peplum tops?

How to make a peplum top from a dress sewing pattern – ペプラムトップス was last modified: December 13th, 2013 by Rin
Decorating

Ruching Tutorial – Make a ruched cushion! ギャザーのよせ方 {Guest Post}

Ruching is an easy sewing technique that adds fun texture and character. Anne from Mama Says Sew is kindly sharing her ruching tutorial here on Sew in Love. Thanks Anne! (by Rin)

Ruching Tutorial

You will need:
  • 1 x 16” square (40.5cms) for the large top square
  • 1 x 11” square (28cms) for the smaller backing square
  • Sewing thread the same colour as the larger top square

Ruching works particularly well on plain, lightweight fabrics which are pale in tone and therefore light reflective. These produce the best textural effects. Lightweight calico (muslin), cottons and silk are suitable.


Step 1. Sew the grid on the large square

It is not necessary to draw a grid onto the large square as the stitched rows do not have to be spaced too regularly. This can be done by hand of course but is easier to do by machine.


Option A: Sewing by hand

If sewing by hand start with a substantial knot, leaving a short end trailing and sew a straight line of running stitches, ¼” (6mm) long, with a slightly smaller gap, across the large square, about 1” (2.5cms) below the top raw edge.

Leave a length of thread trailing at the end of the row. Repeat these rows, about ¾” (2cms) apart to cover the square, with the last row about 1” (2.5cms) up from the bottom raw edge. The stitches do not have to line up under each other as they do with ‘proper’ smocking and again YOU DO NOT HAVE TO WORRY ABOUT BEING TOO ACCURATE. Not often you hear that from a patchworker!

Turn the square through 90 degrees and repeat the above process so that you have a grid of stitches all over the square. The fixing knots will be on two adjacent sides with the trailing threads on the opposite sides. These will be pulled to gather the large square (see Diagram 1).


Option B: Sewing by machine

If sewing by machine use a long, straight stitch and stitch straight rows across the square about ¾” (2cms) apart with the first row about 1” (2.5cms) below the top raw edge and the last row about 1” (2.5cms) up from the bottom raw edge.

Leave long threads trailing at both ends of the rows. Turn the square through 90 degrees and repeat the process in the opposite direction so that you now have a grid of stitches all over the square.

Now a slightly laborious bit, boring but necessary! Knot off the trailing ends on two adjacent sides (see Diagram 1).

How-to-ruching-tutorial-diagrams

Step 2. Gathering the large square

Pin the corners of the large square to the smaller square. Now, row by row, pull gently on one of the trailing threads from the side opposite the knotted threads to gather the fabric of the top square. If the thread catches, stop pulling and try to gather that row from the knotted side instead.

Repeat for all the rows on one side and then do the same in the other direction. Pull up slightly more than necessary and then ease out little by little, trying to keep the gathers about 1” (2.5cms) away from the edge all round (see Diagram 2).

The top square will eventually fit the smaller, bottom square. Pin round the sides taking care to ‘organise’ the gathered edge a little so that the raw edges of the two squares are aligned (see Diagram 3).

Machine or hand stitch all around the square about 3/8” (9mm) from the edge; this will secure the top square in place.


Step 3 – Finishing

Trim the square to 10 ½” (26.5cms), cutting a little from each edge in turn. Take care not to cut the stitches all around the edge or the top square will separate from the bottom square (see Diagram 4).

At this stage you will find that the top square has a tendency to lift away from the bottom square so it is a good idea to secure the layers together at random intervals. You could use little buttons, beads, French Knots or plain stab stitches.

Little pearly beads look great as they glisten in the ruched folds. You now have a 10 ½” (26.5cms) square with which you could make a little cushion or you could add a border to make a larger cushion if required.


About Mama Says Sew

Mama Says Sew started as a result of a chance meeting; I call it serendipity! I teach Patchwork and Quilting classes but during the Summer I sell ice cream from my home to earn money when I’m not teaching. It’s very boring so at the same time I make cushions etc to sell. One day a gentleman and his wife bought ice cream and asked me about my quilts and cushions and whether I could earn a living from making them. Frankly I can’t (the curse for a lot of craft workers) and he said “You do realise that the money is in selling information don’t you?” He told me about an American grandmother whose grandson had set up a website for her to sell her designs as ebooks and she had become very successful.

I thought about what he had said and after a couple of weeks decided to give it a go; what could I lose after all? I had all the notes for the techniques I teach and used these as a basis for creating the PDF patterns. A friend, Jane, also wrote up the instructions for some of her designs and a friend of my son designed the website. My goodness, it sounds so simple when put like that but it was a lot of hard work for all of us. I love the finished result and it’s really just the start because we will be adding new designs all the time.

There are patterns available for Fabric Manipulation techniques, cushions, quilts, things made from your favourite old jeans and I’ve recently added two Basic Patchwork patterns for people who have never tried it before and would like to learn. The patterns are all reasonably priced, with a couple of freebies too, and easy to download and print off at home.

—–

I’m very inspired by Anne’s story and really wish her the very best with her new website selling PDF patterns. My favourites from her store include (left to right) Tumbling Blocks quilt pattern, the Twisted Tucks technique and of course, this Ruching Technique which makes a very chic cushion. It’s wonderful how the online sewing community support each other, so if you like this tutorial, please do visit Mama Says Sew. Thank you! (by Rin)

Mama-says-sew-sewing-patterns

Ruching Tutorial – Make a ruched cushion! ギャザーのよせ方 {Guest Post} was last modified: December 6th, 2013 by Rin
Newer Posts
Older Posts

Hello, I’m Rin

Hello, I’m Rin

I help busy women live a more beautiful and meaningful life. I’m passionate about sewing, crafts, and sustainable living. Let’s start creating! More about me.

COME SEW WITH ME


Free Little Boxy Dress Sewing Workshop

Most Popular

  • Free Sewing Pattern: Reversible V-neck and Crewneck Shift Dress

    January 25, 2015
  • Make your own Free People inspired summer dress!

    Free Sewing Pattern & Tutorial: Free People inspired summer dress

    September 18, 2015
  • Tunic Dress: Is this the best Japanese sewing pattern maker?

    May 7, 2016

Follow @sewinlove on Instagram

  • Introducing one of our fave cities to the girls. Trams and the Japanese food have been a big hit!
  • The last stop on our Far North QLD adventure was Fitzroy Island. We did kayaking, snorkelling and went on a
  • We’ve sadly said goodbye to the incredible Daintree National Park and are heading back towards Cairns. The trip isn’t complete
  • Taking a pause and staying awhile at #capetribcamping , an awesome spot where the rainforest meets the sea. We’ve been
  • Far North Queensland really living up to its reputation now, with super sunny days and lots of wildlife! We saw
  • We picked up our campervan in Cairns and it’s been our cozy home for the last few nights. We’ve visited
  • Week 1 of our Queensland holiday: Long overdue catch up with our Brisbane fam. We made it, despite flight cancellations
  • We had friends coming, so she dusted and vacuumed. Not sure what phase of growing up this is, but I’m
  • Facebook
  • Instagram
  • Pinterest
  • Youtube
  • RSS

©2020 - Sew in Love. All Right Reserved. Sew in Love is a participant in the Amazon Services LLC Associates Program, an affiliate advertising program designed to provide a means for sites to earn advertising fees by advertising and linking to Amazon.com