• Home
  • MAKE
    • Free Sewing Patterns
    • Tutorials
    • Japanese Sewing Patterns
    • Sewing Pattern Review
    • Sew Alongs
    • Accessories
    • Crafts
    • Kids & Baby
    • Knitting
  • My House
  • LIFE
    • Rin’s Life
    • Recipes
    • Healthy Habits
    • Simple Joys
    • Blogging
  • Free Facebook Group
  • About
    • About Rin
    • Disclosure + Privacy Policy

Sew in Love

  • Home
  • MAKE
    • Free Sewing Patterns
    • Tutorials
    • Japanese Sewing Patterns
    • Sewing Pattern Review
    • Sew Alongs
    • Accessories
    • Crafts
    • Kids & Baby
    • Knitting
  • My House
  • LIFE
    • Rin’s Life
    • Recipes
    • Healthy Habits
    • Simple Joys
    • Blogging
  • Free Facebook Group
  • About
    • About Rin
    • Disclosure + Privacy Policy
  • {FREE} Sewing Patterns

  • {FREE} Boxy Dress Workshop

  • {FREE} Japanese Sewing Guide

DIY FashionTutorial

DIY T Shirt into Ruffled Peter Pan Collar Top – Tシャツ リメイク

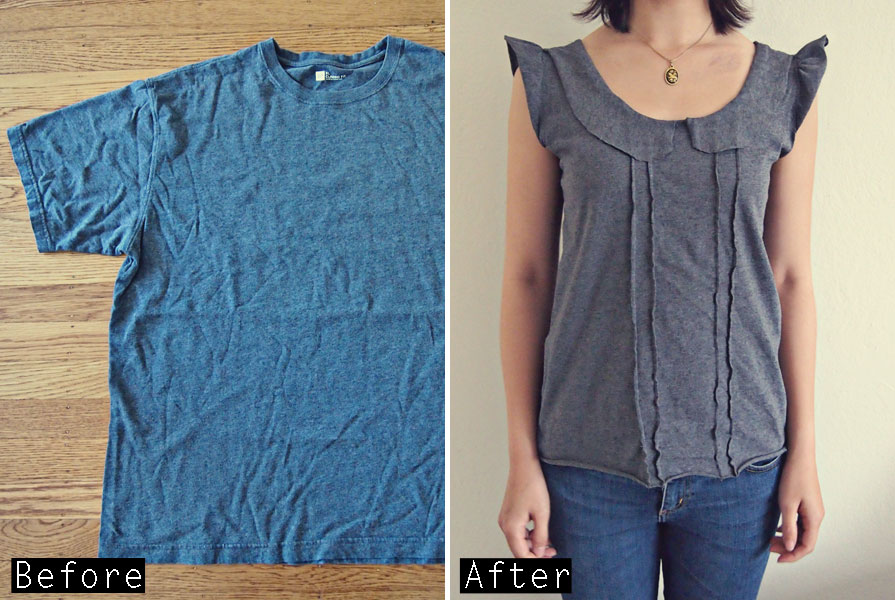
I’ve just rediscovered what a great fabric jersey is when it comes to reconstructing garments. It’s stretchy, doesn’t fray and is easy to cut, making this t-shirt DIY an absolute breeze! I think adding the pin tucks on the front makes the top look more premium.

ニット生地はリメイクが簡単にできていいですよね。ピンタックを入れるといい感じになりました。

Step 1

Use a tank top you own as a guide to trim the arm hole and side seam. Fold shirt lengthways to cut out the neckline.

手持ちのタンクトップをなぞって脇を切ります。縦におってからネックラインを切ります。

Tshirt-remake-tutorial-Tシャツリメイク Step-1

Step 2

Fold and stitch the pin tucks on the front. Trace the front neckline and draw a Peter Pan collar. Add 1cm seam allowance and cut two collars.

ピンタックを作ります。前のネックラインにそって衿の型紙を作ります。1cmの縫い代を付けてから衿を二枚切る。

Tshirt-remake-tutorial-Tシャツリメイク Step-2

Step 3

Attach collar to the wrong side and trim along the curve. Fold down the seam allowance at the shoulder seam. Fold collar down on to right side and hand stitch in place.

裏に衿を付ける。カーブは切り込みを入れる。肩の縫い代を折ってから衿を表に倒す。手縫いで付ける。

Tshirt-remake-tutorial-Tシャツリメイク Step-3

Step 4

Trace along the arm hole curve to make a paper pattern. Add 6cm for ruffles and cut two strips of fabric using the paper pattern. Gather along the straight edge and attach on to arm hole.

袖ぐりにそって型紙を作る。6cmギャザー用に長くしてから2枚切る。ギャザーを入れて袖ぐりに縫う。

Tshirt-remake-tutorial-Tシャツリメイク Step-4

Step 5

Stitch the side seams. Finished!

脇を縫ってでき上がり。

Tshirt-remake-tutorial-Tシャツリメイク Step-6

T-shirt Refashion: Make a peter pan collar top with a pleated front out of a t-shirt!  http://www.sewinlove.com.au/wp-content/uploads/2013/07/DIY-Tshirt-into-Peter-Pan-ruffle-top-Pinterest.jpg

DIY T Shirt into Ruffled Peter Pan Collar Top – Tシャツ リメイク was last modified: July 31st, 2013 by Rin
How to sew Japanese sewing patterns in English
DIY FashionJapanese Sewing Patterns

My first ebook – How to Sew Japanese Sewing Patterns

Wouldn’t it be great if you could sew a Japanese pattern? Without having to learn Japanese? That was my dream for the English speaking sewing community. So it’s with excitement and jitters that I announce my first ever ebook, How to Sew Japanese Sewing Patterns. It’s planned for launch by the end of this month, July 2013!


About the ebook

The sole purpose of How to Sew Japanese Sewing Patterns is to give you the confidence to tackle Japanese sewing projects. It’s full of diagrams, photos and tables to make it as easy as possible.

“The ebook is really easy to understand,
the language is simple and straightforward and
it really covers the basics for understanding Japanese patterns.”
~Novita, www.verypurpleperson.com

How-to-sew-Japanese-sewing-paterns-ebook-Preview-1
It takes you through the entire sewing process, step-by-step, and includes examples to help your learning.

How-to-sew-Japanese-sewing-paterns-ebook-Preview-2
You can take a look at more pages by visiting www.japanesesewingpatterns.com


My Japanese sewing patterns

To complement the ebook, two Japanese sewing patterns with full English translations will also be available. They will include step-by-step instructions with diagrams, as well as sewing tutorials for the difficult steps (like inserting invisible zippers and stitching pleats).

High waist skirt Japanese sewing pattern with English translations.

The website will continue to be updated up until the launch date. You’ll also receive a discount voucher if you sign up to the mailing list, so please visit www.japanesesewingpatterns.com


My first ebook – How to Sew Japanese Sewing Patterns was last modified: July 12th, 2013 by Rin
DIY FashionFree Sewing Patterns

Free Maxi Dress / Skirt Pattern – 2WAY ワンピース無料型紙

This is a DIY pattern for a convertible maxi dress. You can sew one that is tailor-made to your size. To wear as a skirt, simply fold down the bodice. It’s a great piece to pack for your summer holiday!

Materials

Fabric: cotton rayon – コットンレイヨン

Elastic: 6mm wide tape – ゴムテープ (6mm 幅)


How to make

ALL MEASUREMENTS ARE IN CM

Step 1

Cut your fabric into 8 rectangles, using the measuring guide below. The width of each piece is dependent on your bust measurements. The length I used are based on my height (1.65m). Please adjust the length to suit your height. Don’t forget to add 1cm seam allowance.

生地を8つの四角に下の図の用に切断します。四角の幅(Width)はバスト(Bust)を計って計算。長さは自分の身長に合わせてください(私は165cm)。


Free-Maxi-Dress-Pattern-Step-1-Final

Step 2

Zig zag stitch the side edges of all 4 Bodice pieces. Make the inner and outer Bodice pieces by stitching the edges together (2A). Stitch only 3 out of the four edges, so that you can insert elastic later. Press seams open (2B).

見頃の脇を4つジグザグミシン。見頃の表と裏を作る(2A)。ゴムを通すすき間をのこすために脇を3つだけ縫う。縫い代割る(2B)。

Free-Maxi-Dress-Pattern-Step-2

Step 3

Right sides facing, insert the inner bodice inside the outer bodice. Stitch together (3A). Turn to the right side (3B). Insert the inner bodice inside the outer bodice (3C).

見頃(表)を見頃(裏)の中に入れて一緒に縫う (3A)。表に返して(3B)見頃(裏)を中に入れる(3C)。

Free-Maxi-Dress-Pattern-Step-3

Step 4

Stitch the side edges of Skirt 1 and zig zag seams together.

スカート1の脇を縫う。縫い代は一緒にジグザグ。

Step 5

Gather the top edge of the skirt to match the bodice width (5A). Insert bodice inside skirt and stitch together (5B & 5C). Zig-zag stitch the seams together (5D).

スカートにギャザーを寄せる (5A)。見頃と合わせて縫う(5B & 5C)。縫い代は一緒にジグザグ(5D)。

Free-Maxi-Dress-Pattern-Step-5

Step 6

Repeat Step 5 to attach Skirt 2 to Skirt 1.

Step 5 を繰り返してスカート2を付ける。

Step 7

Hem bottom of Skirt 2.

スカート2の裾を三つ折りして縫う。

Free-Maxi-Dress-Pattern-Step-6&7

Step 8

Stitch in a circle, all the way around the Bodice at 1cm intervals about 20 times (8A). Inside should be a gap to insert elastic (8B).

見頃に1cm開けてステッチ20回ほどする (8A)。裏にゴム通し口が出来る(8B).

Free-Maxi-Dress-Pattern-Step-8

Step 9

Insert elastic tape and zig-zag stitch ends together (9A). You can create a smocked look by not inserting elastic into every row (9B).

ゴムテープを通してジグザグミシンでつなげる(9A)。全部の列にゴムを入れないとスモッキングみたいに見えます(9B)。

Free-Maxi-Dress-Pattern-Step-9

Step 10

Cut a piece of fabric 4cm x 4cm. Fold into a small rectangle and stitch along the edge to close (10A). Fold in half to create a loop for the neck strap. Stitch on to the second row of Bodice, being careful to avoid the elastic tape enclosed (10B).

4x4cmの四角を切ってループを作る(10A)。見頃の二列目に付ける(10B)。ゴムテープを縫わないように注意。

Free-Maxi-Dress-Pattern-Step-10

Step 11

Cut a piece of fabric 4cm x 140cm. Fold as described in Step 10 and stitch along the edge to create the neck strap. Finished!

4x140cmの布を切ってStep 10と同じように肩ひもを作る。完成!

Free-Maxi-Dress-Pattern-Step-11


Free Maxi Dress / Skirt Pattern – 2WAY ワンピース無料型紙 was last modified: June 28th, 2013 by Rin
How to sew apron tutorial hand towels エプロン
DIY FashionTutorial

How to sew an apron from hand towels – エプロンの作り方

Do you have mis-matched towels hanging around in your home? It’s easy to sew an apron from hand towels using this simple, upcycling tutorial.

使わないハンドタオルでできちゃう簡単なエプロンの作り方です。

You will need

  • Two hand towels – ハンドタオル二枚
  • Bias ruffle tape – フリルバイアステープ
  • Remnant fabric for waist and neck ties (I used an old sheer curtain) – 残り物生地(私は古いカーテン使用)

How to make

Step 1

Cut two pieces of fabric measuring 10cm x 80cm to make the two neck straps. Fold 1cm seam allowance along each edge and press (1A). Fold this in half lengthways and stitch along the edges (1B).

2枚10cm x 80cmに生地を切ってショルダーストラップを作る。1cm全体に折ってから(1A)半分にしてミシン(1B)。

How-to-sew-hand-towel-apron-tutorial-Step-1

Step 2

Cut the towel for the apron chest piece to desired size. Neaten any raw edges. Cut the ruffle bias tape to fit across the apron chest piece.

エプロンの胸当てをタオルで作る。バイアステープを幅に合わせて切る。

How-to-sew-hand-towel-apron-tutorial-Step-2

Step 3

Attach the neck straps to the apron by enclosing them using the ruffle bias tape.

バイアステープで挟みながらショルダーストラップを付ける。

How-to-sew-hand-towel-apron-tutorial-Step-3

Step 4

Attach the ruffle to the apron bottom piece (4A). Stitch the two apron pieces together, ensuring that the top piece is on top of the bottom piece (4B).

エプロン下にフリルを付けて(4A)胸当に合わせてミシン。ここで胸当てが上に重なるように(4B)。

Step 5

Make the waist strap (approx. 225cm long). You might need to join several pieces of fabric that are 10cm wide to achieve this total length. Fold 1cm of the shorter edge down before folding in half lengthways. Stitch the longer edge closed using a 1cm seam allowance (right sides facing). Turn out the strap to right side and press.

ウエストリボンを作る。225cmぐらいの長さが必要なので10cm幅の生地を何枚かつなげてもよし。1cm折ってから表を合わせてステッチをかける。表に返してアイロン。

How-to-sew-hand-towel-apron-tutorial-Step-456

Step 6

Stitch the waist strap on to the apron, along the bottom towel edge. Stitch all the way along the edge of the waist strap.

エプロン下に合わせてウエストリボンを付ける。りぼん一回りステッチをかける。

How to sew apron from hand towel エプロン作り方

How to sew an apron from hand towels – エプロンの作り方 was last modified: June 12th, 2013 by Rin
DIY FashionJapanese Sewing Patterns

Japanese pattern: Yellow tulle smocked skirt – 手作り ギャザー スカート

This yellow tulle smocked skirt is a longer version of a pattern from the book, “Wrapped in Tenderness” . The book uses gauze for both the lining and the outer skirt, but I used gauze only for the lining and used a polka-dot chiffon-style fabric on the outside.

このギャザースカートは「毎日の心地よい服』のパターンを少し長くしたものです。本では表と裏両方ガーゼを使いますが私は表の生地をシフォン系の水玉模様に変えました。

Yellow-tulle-skirt-Japanese-sewing-pattern-チュール スカート-2

Shirring is not my favourite activity, because it is so difficult to get the elastic to stay straight. It was made especially difficult because I was shirring two very thin fabrics together. I think it turned out ok in the end though. It’s just important to remember to stitch very slowly!

The skirt also has a tulle overlay with a decorative satin ribbon. I was afraid my fabric choices would result in a very see-through skirt, but the combination of gauze, chiffon and tulle made it ok to wear the skirt without a slip underneath. I like wearing the skirt casually with a tee and a black leather jacket.

シャーリングは苦手でゆっくりミシンをかけながら頑張りました。薄い生地を二枚シャーリングするのは難しいですね。

このスカートはチュールのオーバースカートも付いています。選んだ生地だとスカートがあまりにも透けてしまうと心配でしたがガーゼ、シフォン、チュールと三枚重ねたらわりとスリップなしで着れそうです。カジュアルにTシャツと黒い革ジャンでコーディネートしています。

Tulle-skirt-Japanese-sewing-pattern-チュール スカート

I am really digging the designs in this book at the moment. Check out this beautiful Japanese sewing book here. I even have some blue gauze on hand to make a puff-sleeve top next!

この本すごく気に入っています。ここで『毎日の心地よい服』のレビューを書きました。次に作るブラウス用にブルーのガーゼも用意してあります。


Japanese pattern: Yellow tulle smocked skirt – 手作り ギャザー スカート was last modified: June 3rd, 2013 by Rin
Newer Posts
Older Posts

Hello, I’m Rin

Hello, I’m Rin

I help busy women live a more beautiful and meaningful life. I’m passionate about sewing, crafts, and sustainable living. Let’s start creating! More about me.

COME SEW WITH ME


Free Little Boxy Dress Sewing Workshop

Most Popular

  • Free Sewing Pattern: Reversible V-neck and Crewneck Shift Dress

    January 25, 2015
  • Make your own Free People inspired summer dress!

    Free Sewing Pattern & Tutorial: Free People inspired summer dress

    September 18, 2015
  • Tunic Dress: Is this the best Japanese sewing pattern maker?

    May 7, 2016

Follow @sewinlove on Instagram

  • Introducing one of our fave cities to the girls. Trams and the Japanese food have been a big hit!
  • The last stop on our Far North QLD adventure was Fitzroy Island. We did kayaking, snorkelling and went on a
  • We’ve sadly said goodbye to the incredible Daintree National Park and are heading back towards Cairns. The trip isn’t complete
  • Taking a pause and staying awhile at #capetribcamping , an awesome spot where the rainforest meets the sea. We’ve been
  • Far North Queensland really living up to its reputation now, with super sunny days and lots of wildlife! We saw
  • We picked up our campervan in Cairns and it’s been our cozy home for the last few nights. We’ve visited
  • Week 1 of our Queensland holiday: Long overdue catch up with our Brisbane fam. We made it, despite flight cancellations
  • We had friends coming, so she dusted and vacuumed. Not sure what phase of growing up this is, but I’m
  • Facebook
  • Instagram
  • Pinterest
  • Youtube
  • RSS

©2020 - Sew in Love. All Right Reserved. Sew in Love is a participant in the Amazon Services LLC Associates Program, an affiliate advertising program designed to provide a means for sites to earn advertising fees by advertising and linking to Amazon.com