• Home
  • MAKE
    • Free Sewing Patterns
    • Tutorials
    • Japanese Sewing Patterns
    • Sewing Pattern Review
    • Sew Alongs
    • Accessories
    • Crafts
    • Kids & Baby
    • Knitting
  • My House
  • LIFE
    • Rin’s Life
    • Recipes
    • Healthy Habits
    • Simple Joys
    • Blogging
  • Free Facebook Group
  • About
    • About Rin
    • Disclosure + Privacy Policy

Sew in Love

  • Home
  • MAKE
    • Free Sewing Patterns
    • Tutorials
    • Japanese Sewing Patterns
    • Sewing Pattern Review
    • Sew Alongs
    • Accessories
    • Crafts
    • Kids & Baby
    • Knitting
  • My House
  • LIFE
    • Rin’s Life
    • Recipes
    • Healthy Habits
    • Simple Joys
    • Blogging
  • Free Facebook Group
  • About
    • About Rin
    • Disclosure + Privacy Policy
  • {FREE} Sewing Patterns

  • {FREE} Boxy Dress Workshop

  • {FREE} Japanese Sewing Guide

DIY FashionSew Alongs

Burdastyle Mens Cardigan Andrew Sew Along Part 3 (final): Sleeves and Buttonholes

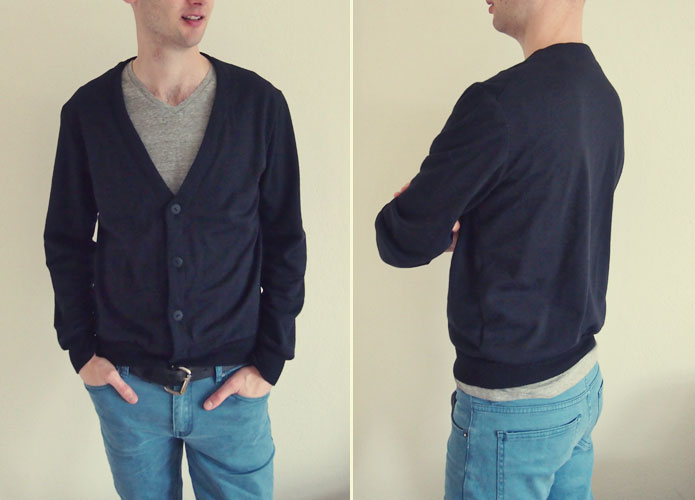
My Burdastyle Andrew cardigan is finished, just in time for Valentine’s Day! In the final part of this sew along, we’ll make and attach the sleeves. We’ll also make the buttonholes to complete the cardigan so you can give it to your loved one this Valentine’s Day.

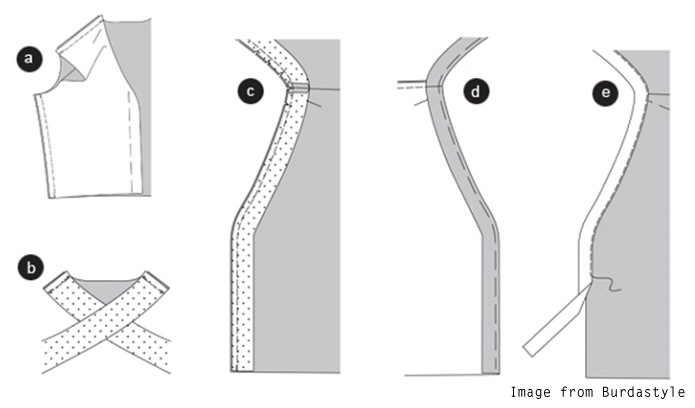
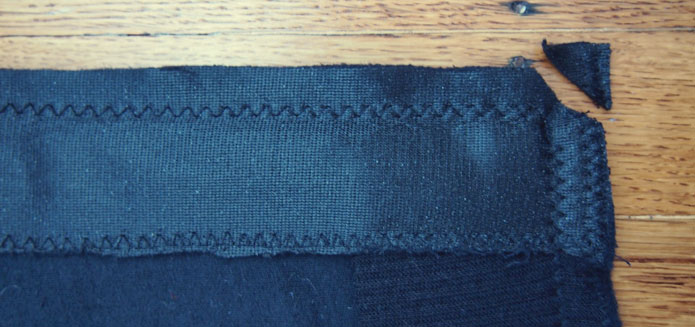
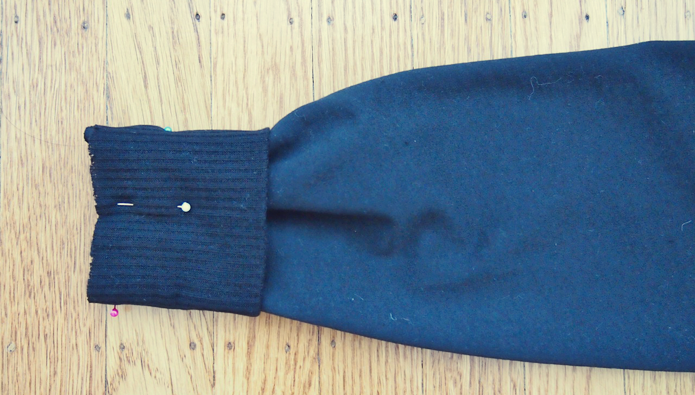
Sleeve and Sleeve Cuff

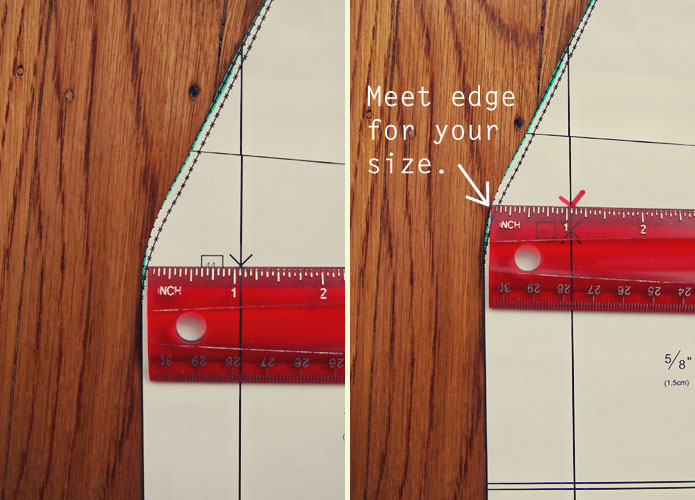
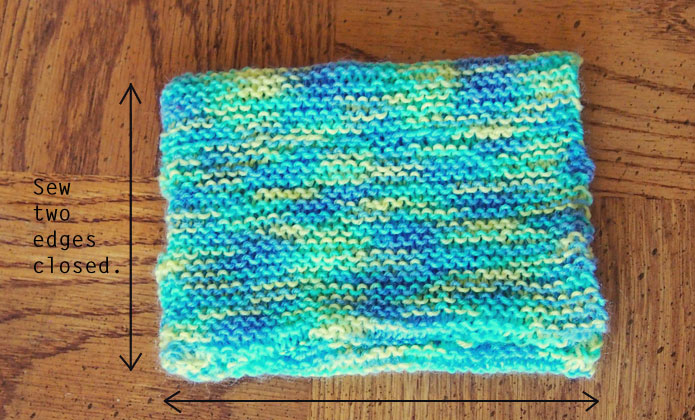
This step is pretty simple, just make sure that all seams meet so you have a professional finish.
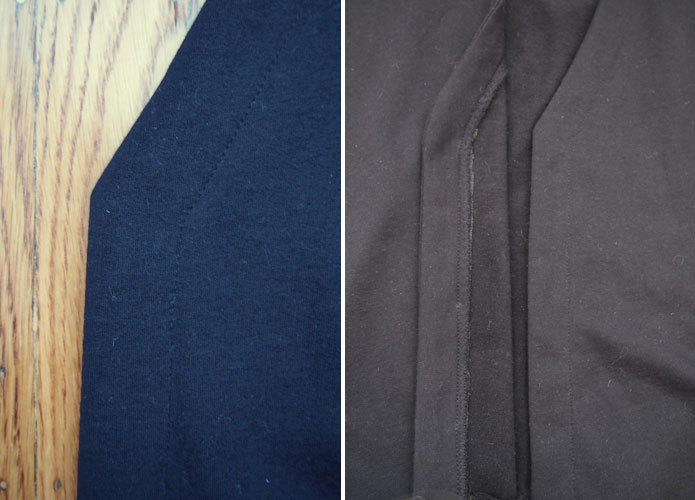
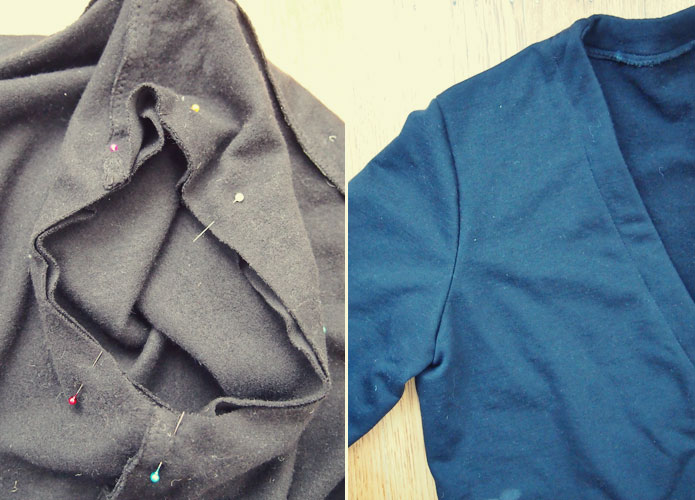
Burdastyle-Andrew-Cardigan-Sew-Along-Part3-sleeves


Attach the Sleeve

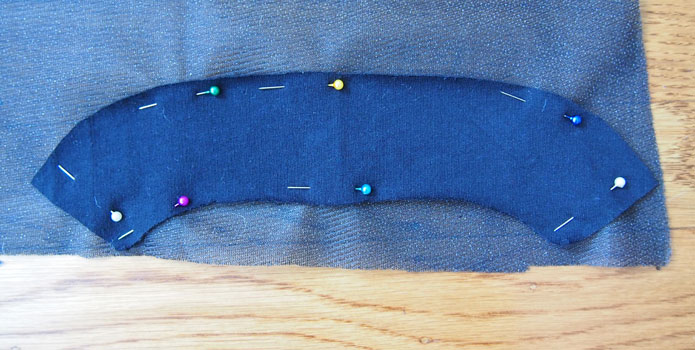
It took me several attempts at pinning the sleeve on to the body piece to get the curves correct. This is REALLY hard to photograph, but you can see I was not stingy with the pins! I stitched very, very slowly around the curves to sew them as accurately as possible.
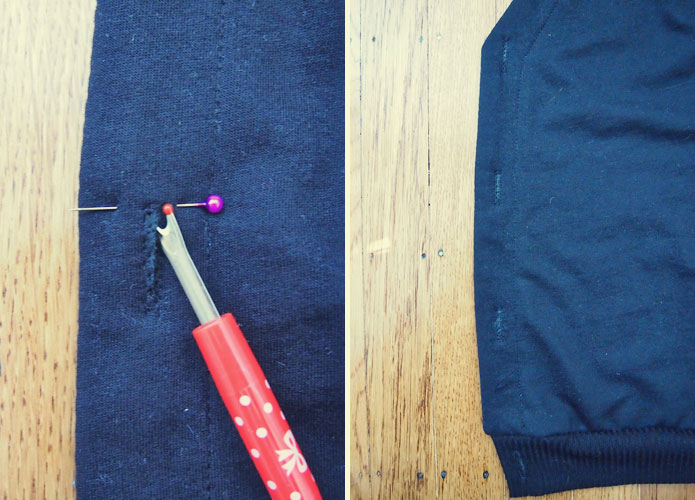
Burdastyle-Andrew-Cardigan-Sew-Along-Part3-armholes


Make Buttonholes

You need to make 3 buttonholes on the main fabric, and 1 on the waistband, using the buttonhole foot on your machine. Use a pin and seam ripper to cut the fabric where the button will go through.

Burdastyle-Andrew-Cardigan-Sew-Along-Part3-buttonholes


Attach Buttons

Stitch on 4 buttons and it’s finished! Yay!

Burdastyle-Andrew-Cardigan-Sew-Along-Part3-Finished


Now that I know how the cardigan fits on my husband, I realise I need to lengthen it slightly. I think the shoulders look a bit too wide on him as well. I enjoyed this sewing pattern so I can definitely see myself making it again, with the adjustments. He really likes the cardigan, by the way! The fabric is really soft and lightweight, so he can wear it all year round here in San Francisco.

This project also helped me get over my fear of knit fabrics, one of the sewing goals I set out for 2014. I was pleasantly surprised at how easy sweatshirt knit was to handle, especially when cutting. Next up, I’d like to try sewing ponte knits and sweater knits, I think.

How did your Burda Patterns Andrew cardigan go? Did you like the sewing pattern?

Burda Patterns Andrew Cardigan: Let's sew this mens cardigan sewing pattern together! The pattern is available from Burda Patterns. I've chosen an organic fleece fabric for my cardigan :)

Burdastyle Mens Cardigan Andrew Sew Along Part 3 (final): Sleeves and Buttonholes was last modified: February 12th, 2014 by Rin
DIY FashionSew Alongs

Burdastyle Mens Cardigan Andrew Sew Along Part 2: Body and Waist Band

Now we get to enjoy the fun part of Burdastyle’s Andrew cardigan; sewing! In Part 1, we cut the pattern and fabric. Today in Part 2, let’s sew the the main body section, including the neckline and ribbed waistband.


Shoulder and Side Seams

I used a zig-zag stitch with a ball point needle for all of my seams, because I’m working with a sweatshirt knit fabric. It really helps to get the right settings by testing on scrap fabric. Ideally, you can neaten the seam allowances with a serger or overlocker. Unfortunately, my beloved overlocker is back home in Australia, so I used an overcast zig-zag stitch instead.

Burdastyle-Andrew-Cardigan-Sew-Along-Button-Seams


Neckline Facing

The instructions go into detail about using a woven trim for the neckline. I found this quite confusing, so here is what I did. First, zig-zag stitch along the outer edge of the neckline facing. Then, right sides facing, stitch the inner edge of the neckline facing to the front opening of the cardigan. Snip along the curves.

Burdastyle-Andrew-Cardigan-Sew-Along-Button-Kneckline


Attaching the Waist Band

Once you’ve made the waistband following Burdastyle’s instructions, pin it on to the cardigan. Turn the neckline facing and also pin this on to the waistband and cardigan’s hem.

Burdastyle-Andrew-Cardigan-Sew-Along-Button-Waistband1


After stitching the waistband on to the cardigan, zig-zag the edges together for a neat finish.

Burdastyle-Andrew-Cardigan-Sew-Along-Button-Waistband2

I also snipped the corner where the cardigan, waistband and neckline facing meet to remove some bulk.

Burdastyle-Andrew-Cardigan-Sew-Along-Button-Waistband-Snip


Topstitch the Neckline

Fold the neckline facing back to the inside of the cardigan and topstitch with a straight stitch. This stitch is visible, so be extra careful about sewing straight!

Burdastyle-Andrew-Cardigan-Sew-Along-Button-Topstitch-Neckline


I’m finding sweatshirt knit to be really fun and easy to sew. It’s not long to go now, in Part 3, let’s make the sleeves, attach buttons and finish the cardigan!

Burdastyle Mens Cardigan Andrew Sew Along Part 2: Body and Waist Band was last modified: February 6th, 2014 by Rin
DIY FashionSew Alongs

Burdastyle Mens Cardigan Andrew Sew Along Part 1: Print and Cut the Pattern

Welcome to Part 1 of the Burdastyle Andrew cardigan sew-along. Let’s talk about fabric, printing the pattern and cutting it out. Burdastyle recommends wool knit fabric or cotton sweatshirt fabric for this project. I wanted to make my cardigan really cozy, so I’ve opted for this black, organic sweatshirt fleece from Fabric.com. You also need ribbed knit fabric for the cuffs and waistband. My husband wears brightly coloured t-shirts to work, so I’ve kept the cardigan simple by keeping everything black.

On the Burdastyle website, there are some great versions of Andrew using a contrasting rib knit. You also need matching interfacing and buttons. The pattern calls for snap buttons, but I’m using standard plastic buttons instead.

Burdastyle-Andrew-Cardigan-Sew-Along-Fabric

Printing

If you’re printing the sewing pattern at home, you need to use either A4 or Legal Size (US) paper. Being new to the US, I had no idea what Legal Size meant. It seems to be a longer version of the standard, A4 size. The most important thing is to set the printer to DO NOT SCALE.

Gluing and cutting the pattern

Definitely not my favourite part of sewing! I l trimmed the top and right edges of each sheet using a stanley knife and stick the sheets together with a glue stick. Just listen to a podcast and it’ll all be done before you know it. There are 8 pattern pieces in total.

Burdastyle-Andrew-Cardigan-Sew-Along-Paper-Patterns

Cutting the pattern and fabric

What is labelled as ANKLE BAND is actually the front waist band. The instructions tell you to mark the placement of the top snap button on the FRONT body piece. To do this, I measured the distance from the edge of Size 44 to the black X mark on the sewing pattern (1 1/16″). Then, slide your ruler up until you hit the edge for the size which you are making. My cardigan will be Size 46, so this is where I placed the X (in red) for my top snap button. Mark the same spot on your fabric.

Burdastyle-Andrew-Cardigan-Sew-Along-Button-Position

Interfacing

Interfacing is required along the three facing pieces. I like to pin my fabric on to the interfacing and then cut it out.

Burdastyle-Andrew-Cardigan-Sew-Along-Button-Interfacing


That’s it for Part 1! Next time, let’s sew the body and the waistband. What fabric have you chosen to use for your Andrew cardigan?

Burdastyle Mens Cardigan Andrew Sew Along Part 1: Print and Cut the Pattern was last modified: February 2nd, 2014 by Rin
DIY FashionSew Alongs

Burdastyle Mens Cardigan Andrew – Sew Along for Valentine’s Day

We have just under 3 weeks before Valentine’s Day is upon us. Why not sew your special man the Burdastyle Andrew cardigan? It’s a classic, v-neck cardigan with a ribbed cuff and bottom band. Best part is, you can steal it to wear the “boyfriend” cardigan trend!

Every few days, I’ll be posting my progress with sewing this cardigan. I hope you can join me so we can share tips and tricks along the way.

The Pattern

This cardigan sewing pattern #6030 can be purchased from Burdastyle for $5.99. It’s a downloadable pattern, which needs to be printed at home.

Materials

I’ve chosen an organic cotton sweatshirt fabric in Black from Fabric.com, with a matching black, rib knit. I also have four black buttons ready to go. Don’t forget your ball point needle!


Burdastyle Mens Cardigan Andrew – Sew Along for Valentine’s Day was last modified: January 24th, 2014 by Rin
Kids & BabyKnitting

Free baby hat knitting pattern with pom poms: Garter stitch only!

Here is a super quick baby hat knitting pattern I found on a Japanese craft website, Atelier. It’s extremely easy because you only need to know how to garter stitch. I’ve tried to make the instructions more clear and simple than the original Japanese version.

What you need

  • 8 ply yarn
  • 4.5mm knitting needles (US 7)
  • Yarn needle

Free-baby-hat-knitting-pattern-garter-stitch-materials

How to make

Step 1

Cast on 34 stitches. Knit in garter stitch (knit every row) until the piece measures 28cm (11 inches). Bind off.

Free-baby-hat-knitting-pattern-garter-stitch-Step1

Step 2

Fold knitted piece in half. Sew two of the seams closed. Turn hat inside out to hide stitches.

Free-baby-hat-knitting-pattern-garter-stitch-Step2

Step 3

To make the pom poms, wrap yarn around a business card 100 times.

Free-baby-hat-knitting-pattern-garter-stitch-Step3


Step 4

Remove yarn from business card and tie a tight knot in the middle. Leave a long tail to be used to sew onto hat later.

Free-baby-hat-knitting-pattern-garter-stitch-Step4

Step 5

Snip the loops of yarn and fluff it out to make an even, round pom pom. Make two pom poms.

Free-baby-hat-knitting-pattern-garter-stitch-Step5

Free-baby-hat-knitting-pattern-garter-stitch-Step6

Step 6


Stitch the pom poms to the two, closed corners of the baby hat. Roll up the opening of the hat as a brim. Finished!

Free-baby-hat-knitting-pattern-garter-stitch-Pinterest

If you are a fast knitter, you should be able to make this hat in 30 minutes! I love that it’s just a simple garter stitch made pretty with pom poms. You can also play around with the size to suit many different ages.

Free baby hat knitting pattern with pom poms: Garter stitch only! was last modified: January 14th, 2014 by Rin
Newer Posts
Older Posts

Hello, I’m Rin

Hello, I’m Rin

I help busy women live a more beautiful and meaningful life. I’m passionate about sewing, crafts, and sustainable living. Let’s start creating! More about me.

COME SEW WITH ME


Free Little Boxy Dress Sewing Workshop

Most Popular

  • Free Sewing Pattern: Reversible V-neck and Crewneck Shift Dress

    January 25, 2015
  • Make your own Free People inspired summer dress!

    Free Sewing Pattern & Tutorial: Free People inspired summer dress

    September 18, 2015
  • Tunic Dress: Is this the best Japanese sewing pattern maker?

    May 7, 2016

Follow @sewinlove on Instagram

  • Introducing one of our fave cities to the girls. Trams and the Japanese food have been a big hit!
  • The last stop on our Far North QLD adventure was Fitzroy Island. We did kayaking, snorkelling and went on a
  • We’ve sadly said goodbye to the incredible Daintree National Park and are heading back towards Cairns. The trip isn’t complete
  • Taking a pause and staying awhile at #capetribcamping , an awesome spot where the rainforest meets the sea. We’ve been
  • Far North Queensland really living up to its reputation now, with super sunny days and lots of wildlife! We saw
  • We picked up our campervan in Cairns and it’s been our cozy home for the last few nights. We’ve visited
  • Week 1 of our Queensland holiday: Long overdue catch up with our Brisbane fam. We made it, despite flight cancellations
  • We had friends coming, so she dusted and vacuumed. Not sure what phase of growing up this is, but I’m
  • Facebook
  • Instagram
  • Pinterest
  • Youtube
  • RSS

©2020 - Sew in Love. All Right Reserved. Sew in Love is a participant in the Amazon Services LLC Associates Program, an affiliate advertising program designed to provide a means for sites to earn advertising fees by advertising and linking to Amazon.com