• Home
  • MAKE
    • Free Sewing Patterns
    • Tutorials
    • Japanese Sewing Patterns
    • Sewing Pattern Review
    • Sew Alongs
    • Accessories
    • Crafts
    • Kids & Baby
    • Knitting
  • My House
  • LIFE
    • Rin’s Life
    • Recipes
    • Healthy Habits
    • Simple Joys
    • Blogging
  • Free Facebook Group
  • About
    • About Rin
    • Disclosure + Privacy Policy

Sew in Love

  • Home
  • MAKE
    • Free Sewing Patterns
    • Tutorials
    • Japanese Sewing Patterns
    • Sewing Pattern Review
    • Sew Alongs
    • Accessories
    • Crafts
    • Kids & Baby
    • Knitting
  • My House
  • LIFE
    • Rin’s Life
    • Recipes
    • Healthy Habits
    • Simple Joys
    • Blogging
  • Free Facebook Group
  • About
    • About Rin
    • Disclosure + Privacy Policy
  • {FREE} Sewing Patterns

  • {FREE} Boxy Dress Workshop

  • {FREE} Japanese Sewing Guide

Decorating

Cushion Obsession – Handmade Cushion Covers

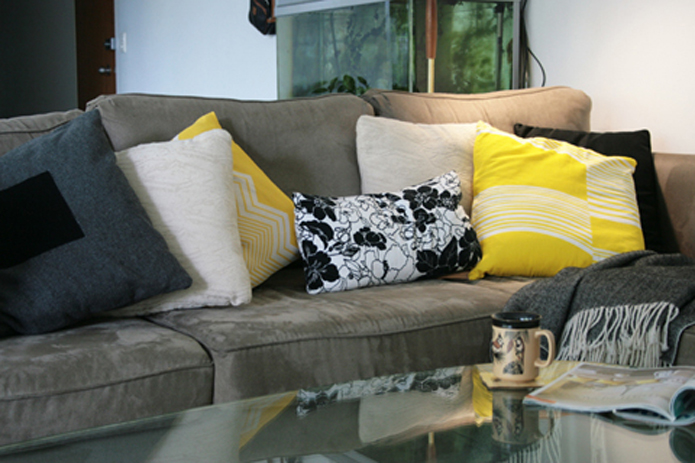
I think decorative cushions brings out the interior designer in everyone!  They instantly add a homely, lived-in feel and it’s such an easy way to accentuate the colour scheme of the room.  I’ve scattered heaps around our apartment, so Dave has now banned me from making anymore cushions…

On the couch (above) – L to R: Grey wool cushion from Country Road, Custom made cream cushion (free with cane lounge set bought on eBay), Yellow cushion made from a vintage knit top bought on eBay,  Handmade black and white floral cushion made from fabric used to upholster our dining chairs, Yellow and white cushion made from IKEA fabric, Black cushion from Kmart.

On our bed (below) – Grey vintage inspired fabric from Kelani Fabrics (www.kelanifabric.com.au).  My Mum helped me stencil and applique the sheep cushion…1 sheep….2 sheep…  The beige fabric is leftover IKEA fabric from my living room curtains.

On the guest futon (below) – Green and red cushions made from IKEA fabrics.  The birdy cushion is made from leftover gingham check fabric I found at Mum’s house, with red felt applique for the birdy.

I totally get how annoying it is to have to throw off all the cushions to get yourself into bed…but it looks cute, right?


Cushion Obsession – Handmade Cushion Covers was last modified: June 6th, 2010 by Rin
Kids & Baby

Felt Friends – Possum on the Gum Tree

There’s a “tree” in our living room, made of twigs poked into a pot supported by river stones.  Using felt squares, I have made gum leaves to hang and a little possum friend.  He can even swing upside down from his tail!

There is a beautiful gum tree that just reaches past our balcony.  I would love to replicate the round little gumnuts on this tree one day for my mini indoor version I have here.  Australian native flora and fauna are so unique and precious.  This project has definitely fueled my Australiana passion, so I’m predicting many more Aussie icons in my craft projects.

It was all a bit of fun and quick to make, here is a free Gum Leaf and Felt Possum Pattern.

How to make Felt Possum

You will need grey, black, brown and white felt.  Also craft glue and stuffing.

  1. Cut out following pieces: 2 body, 2 tails and 4 ear/arm/leg patterns out of grey felt.  2 ears out of brown felt.  2 eyes(1), and 1 tail tip from white felt.  2 eyes(2) from black felt.
  2. Glue black eye in center of white eye and glue onto the possum head of the front body piece.  Fold the brown ear in the center and stitch onto possum head.  Repeat with other ear.
  3. Stitch a nose with pink thread and some whiskers and a belly button with black thread also on the front body piece.
  4. Glue the white tail tip to one grey tail piece, stitch and insert stuffing.
  5. Glue arms and legs onto inside back piece of possum body.  Stitch tail onto back piece.
  6. Stitch the front and back possum body together and insert stuffing.
Felt Friends – Possum on the Gum Tree was last modified: June 1st, 2010 by Rin
AccessoriesDIY Fashion

How to Make a Clip On Bow Tie Accessory

This very versatile little bow only takes minutes to make. It adds instant cuteness to anything you can clip it on!
You need:

  • Fabric 1 (8cm x 13cm)
  • Fabric (6cm x 12cm)
  • 2.5cm wide ribbon (approx. 5cm)
  • Hair clip (or a safety pin but I like to avoid poking holes into my clothes)
  1. Fold each fabric in half, right sides facing. Stitch along the two longer edges.
  2. Turn fabric inside out. Fold in the remaining raw edge and hand stitch to make a neat edge.
  3. Place two fabrics on top of each other and secure the centre with a piece of ribbon.
  4. Stitch the ribbon and attach to your clothes, hair and accessories with a hair clip.

Wearibility; on shirts and vests, bags, your hair, clip on a chain and wear as a big pendant…

How to Make a Clip On Bow Tie Accessory was last modified: June 1st, 2010 by Rin
Newer Posts
Older Posts

Hello, I’m Rin

Hello, I’m Rin

I help busy women live a more beautiful and meaningful life. I’m passionate about sewing, crafts, and sustainable living. Let’s start creating! More about me.

COME SEW WITH ME


Free Little Boxy Dress Sewing Workshop

Most Popular

  • Free Sewing Pattern: Reversible V-neck and Crewneck Shift Dress

    January 25, 2015
  • Make your own Free People inspired summer dress!

    Free Sewing Pattern & Tutorial: Free People inspired summer dress

    September 18, 2015
  • Tunic Dress: Is this the best Japanese sewing pattern maker?

    May 7, 2016

Follow @sewinlove on Instagram

  • Introducing one of our fave cities to the girls. Trams and the Japanese food have been a big hit!
  • The last stop on our Far North QLD adventure was Fitzroy Island. We did kayaking, snorkelling and went on a
  • We’ve sadly said goodbye to the incredible Daintree National Park and are heading back towards Cairns. The trip isn’t complete
  • Taking a pause and staying awhile at #capetribcamping , an awesome spot where the rainforest meets the sea. We’ve been
  • Far North Queensland really living up to its reputation now, with super sunny days and lots of wildlife! We saw
  • We picked up our campervan in Cairns and it’s been our cozy home for the last few nights. We’ve visited
  • Week 1 of our Queensland holiday: Long overdue catch up with our Brisbane fam. We made it, despite flight cancellations
  • We had friends coming, so she dusted and vacuumed. Not sure what phase of growing up this is, but I’m
  • Facebook
  • Instagram
  • Pinterest
  • Youtube
  • RSS

©2020 - Sew in Love. All Right Reserved. Sew in Love is a participant in the Amazon Services LLC Associates Program, an affiliate advertising program designed to provide a means for sites to earn advertising fees by advertising and linking to Amazon.com