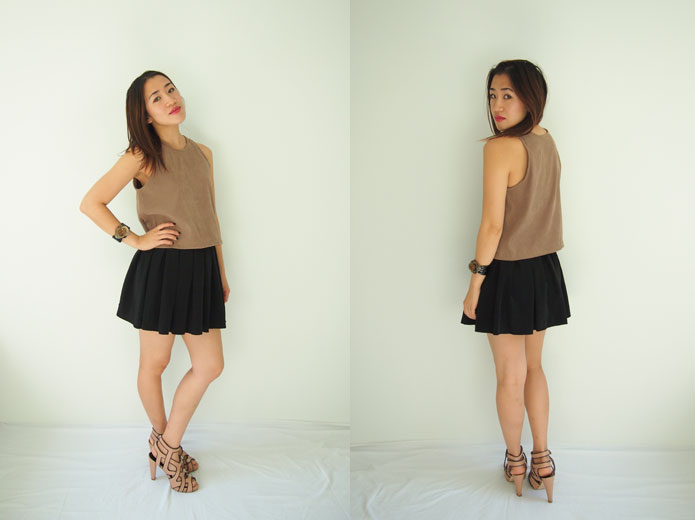
• Home
  • MAKE
    • Free Sewing Patterns
    • Tutorials
    • Japanese Sewing Patterns
    • Sewing Pattern Review
    • Sew Alongs
    • Accessories
    • Crafts
    • Kids & Baby
    • Knitting
  • My House
  • LIFE
    • Rin’s Life
    • Recipes
    • Healthy Habits
    • Simple Joys
    • Blogging
  • Free Facebook Group
  • About
    • About Rin
    • Disclosure + Privacy Policy

Sew in Love

  • Home
  • MAKE
    • Free Sewing Patterns
    • Tutorials
    • Japanese Sewing Patterns
    • Sewing Pattern Review
    • Sew Alongs
    • Accessories
    • Crafts
    • Kids & Baby
    • Knitting
  • My House
  • LIFE
    • Rin’s Life
    • Recipes
    • Healthy Habits
    • Simple Joys
    • Blogging
  • Free Facebook Group
  • About
    • About Rin
    • Disclosure + Privacy Policy
  • {FREE} Sewing Patterns

  • {FREE} Boxy Dress Workshop

  • {FREE} Japanese Sewing Guide

Crop tank top free sewing pattern
DIY FashionFree Sewing Patterns

Free crop tank top sewing pattern and tutorial

Top – Handmade
Skirt – Supre
Bangle – Mimco
Shoes – Loeffler Randall via Revolve Clothing

Do you ever walk into stores and go, “I can totally make that”, or “there’s no way I’m paying for that, it’s so easy to make!”  This is one such top.  Although it took me a long time to get around to actually making it, as I had thought, it was super easy to both draft up and sew.

This cropped tank top is a real wardrobe staple and goes well with all high waisted bottoms. The neutral colour is a bonus. I bought the fabric at Vinnie’s (Australian charity store) last year, thinking I would use it to make some palazzo pants. Well, the palazzo pants trend came and went, so I have made something less fashionable and more practical instead. It’s a lovely suede-like material, quite thick and best of all, does not fray.

I must apologise for my lack of blogosphere presence.  I do have the best excuse of all, and that is that I am after all getting married in less than 5 weeks (!).  As much as I’ve loved the organisation process and making decorations and things, it definitely takes up a lot of my time. Let’s just say I’m really looking forward to the honeymoon.

The pattern I drew is available for download from my Free Creative Resources Library, which you can sign up to access below:

It’s a very easy, basic pattern, but here are some instructions anyway.

  1. Right sides facing, sew the shoulders of the front and back pieces together.
  2. Use bias binding to finish off the neckline. I made my own bias binding from the same fabric.
  3. Right sides facing, sew the side seams together.
  4. Use bias binding to finish off the armholes.
  5. Fold up the hem and stitch.

Free Sewing Pattern for an easy crop tank top. Make in lots of different colours and wear with your favorite high waisted bottoms. Instructions at Sew in Love:  http://www.sewinlove.com.au/2012/04/01/free-crop-tank-top-sewing-pattern-and-tutorial/

Free crop tank top sewing pattern and tutorial was last modified: April 1st, 2012 by Rin
Etsy handmade ribbon wedding headband
LifestyleRin's Life

Etsy wedding shopping – what I bought

With the Australian dollar on a high, I have been doing a lot of shopping online, especially from stores in the US.  One of my absolute favourites is of course, Etsy. I love how it is a treasure trove of unique items you know that no one else is going to have. My only gripe with Etsy is the search function. It is so bad. I wish they had better categorising, so that you didn’t have to guess whether a seller describes a mini dress as “short dress”, “cocktail dress” or “above knee dress” etc.  These descriptions are so subjective..

Anyway, the point of this post is less about whinging and more about showing off some lovely items I have purchased from Etsy for my wedding. First up is this ribbon headband with beautiful gems and ivory silk by TheRedMagnolia. It originally came as a metal headband, but TheRedMagnolia kindly custom made one for me using ribbon instead. Metal headbands give me massive headaches after a while.  The ivory ribbon matches the colour of my wedding dress perfectly.  So excited.

We are going to have a candy buffet bar at our wedding, so I was on the lookout for cute paper bags for the guests to fill up with lollies. Did I mention that the wedding theme colours are yellow and blue? Well I found these adorable candy stripe yellow paper bags at DimeStoreBuddy. They also happened to stock paper straws, in both of my theme colours, so I snapped them up as well. The lovely at Kathy from DimeStoreBuddy also sent me a PDF of flags I can customise and print out to stick on the straws.

Etsy wedding lolly candy party bags paper straws

Wedding lolly candy paper bag sticker label


I have ordered these round product label stickers from Vistaprint, which match my invitations and I will be sticking them on to 125 paper bags with my ever so loyal girlfriends. I love you guys.


My latest purchase are not exactly wedding items, but they are equally exciting. I found a lovely velvet vintage dress go wear for my hens night out from prelovedapparel. Couldn’t help myself upon looking at all the other items in the store, I also bought a vintage black mini skirt. I wear my vintage brown leather mini skirt a lot, so I figured a black one will be equally handy.

Etsy vintage dress and black leather mini skirt

There’s a few more items sitting in my favourites list, so I’m sure I’ll have another splurge on Etsy very soon.

Etsy wedding shopping – what I bought was last modified: March 3rd, 2012 by Rin
AccessoriesDIY Fashion

How to make eco shopping bag from an old pillowcase

Want to know how to make eco shopping bags? I made these eco shopping bags for Christmas presents, out of vintage pillow slips.  We wanted to minimise the use of wrapping paper so making reusable bags was our solution.  I think we should get bonus eco points for upcycling vintage pillowcases.  I used the Clover bias binding maker for the first time, and it is fantastic—I highly recommend it!

How to make eco shopping bags

Step 1

Firstly, fold the pillowcase in half lengthways.  Draw a handle in the middle, which is at least 25cm (10″) long and 7cm (2 3/4″) wide.  Ensure that the pillowslip opening is on top.

Step 2

Cut out the curves on either side of the handle. You should end up with four handles symmetrical to each other.

Step 3

Finish off the edges of the handles with either bias binding or an overlocker.  I made both versions.

For the bias binding version, I made bias binding from the off-cuts of the pillow slip (thank you Clover bias binding maker) and then pressed a 2cm (3/4″) bias binding tape in half and attached it to the bag with basting stitches.  It was then stitched on to the raw edges of the bag with a sewing machine.

For the overlocker version, simply run a rolled hem stitch all the way around the raw edges.

Free Sewing Patterns + Craft Projects Library

Sign up to get more patterns, projects and creative resources in my free library. Start making beautiful things today!

Powered By ConvertKit

Step 4

To complete the handle, you need to attach the top of the handles together. Firstly, turn the entire bag inside out.  With the right sides facing, stitch the handles together, 3cm (1 1/8″) in from the top of the handle.  Fold the end down on the handle and stitch in place.  Stitch over both lines twice to ensure strength.  To finish off, you just need to repeat on the other handle.

How to make eco shopping bags from old pillow slips

This is so easy and such a wonderful way to use up lovely old pillowcases.  It was a real hit with the family, they ended up stuffing their other Christmas gifts into the bag to take home.  It was nice to see the bags in use immediately! For handmade holiday gift ideas, take a look at all these projects here.

In conclusion, if you’re an eco warrior trying to reduce plastic waste, then give these eco shopping bags a go.

Upcycle vintage pillowcases into unique eco shopping bags! Very easy sewing project you can complete in 20 minutes. Tutorial at http://www.sewinlove.com.au/2012/01/26/eco-shopping-bag-pillowcase/

How to make eco shopping bag from an old pillowcase was last modified: September 24th, 2020 by Rin
Decorating

How to Make Bunting Flags – the ultimate tutorial

Now that Christmas has passed, I am focusing all of my crafting efforts on our upcoming wedding.  I cannot believe I only have four months to make all the bits and pieces for our wedding day!  First up are the bunting flags, which will be hung along the aisle for the ceremony.  In keeping with our theme, I made them out of yellow and blue fabric, all of which I bought when I went fabric shopping in Tokyo this year.  There’s lots of bunting tutorials online, but this one focuses on getting a really neat finish for a double sided bunting flag, with minimal fuss.

What you need (to make 2m of bunting):

  • 3m of bias binding (2.5cm wide)
  • Fabric for bunting flags

1. Cut out flags using pattern.

Make a triangle shape pattern for the flags with cardboard (16cm x 23cm).  Fold your fabric in half, right sides facing.  Place the base of the triangle along the fold and trace.  To minimise fabric waste, move the triangle upside down to trace another triangle next to the first one.  I got five triangles out of this piece of fabric.  Cut out using pinking shears.  This prevents fraying, which means you don’t have to finish the edges.

2. Stitch the longer edges together.

Pin each flag together, wrong sides facing, ensuring that the zig zag pattern made by the pinking shears match up.  Straight stitch along the two longer edges with approximately 1cm seam.  Just let the thread continue through each flag, you can cut the thread to separate the flags at the end.  This saves time and thread.

3. Baste flags onto bias binding.

This part is a bit painful, but it’s worth it to get a neat finish.  Press bias binding in half, then pin the flags on to the inside.  Allow 50cm at each end of the bias binding for tying up.  Space the flags 2cm apart and you should get about 11 flags onto 3m of bias binding.  Then, fold the bias binding over the top and baste everything together.

4. Stitch to finish.

Stitch over the bias binding, very close (about 1mm) to the edge to ensure that the flags are enclosed.  Remove basting stitches.

How to Make Bunting Flags – the ultimate tutorial was last modified: December 31st, 2011 by Rin
DIY Vintage Stuffed Doll Toy | I made this rag doll from fabric scraps. Her dress is Amy Butler fabric :D
Kids & Baby

Sewing a Doll for Christmas Presents

The countdown to Christmas has begun!  Every weekend is now dedicated to sewing and crafting.  Yesterday, Dave and I cut out red paper hearts to hang around our apartment, and we made metres and metres of paper garlands to get us into the festive mood.  The most fun part though, was decorating our fish tank.  I stuck little red hearts on the glass so that our fish can also be part of the silly season!

As with every Christmas, the majority of our gifts to family are going to be handmade, starting with this doll I am making for my two toddler nieces.  The pattern is from a Japanese magazine I picked up at a secondhand bookstore near Tokyo.  It looks to be a special edition just dedicated to doll making, how awesome is that?   The doll on the bottom left is the one I made.  Seriously, anyone who can sew a straight line can make this doll.

Here are a few more pages from this magazine.  I highly recommend making fabric toys and dolls as presents (or for yourself).  They are adorable and a lot of fun to make.  What a fantastic way to use up those fabric remnants too!  How are your Christmas preparations going?  Have you made anything?

Sewing a Doll for Christmas Presents was last modified: December 11th, 2011 by Rin
Newer Posts
Older Posts

Hello, I’m Rin

Hello, I’m Rin

I help busy women live a more beautiful and meaningful life. I’m passionate about sewing, crafts, and sustainable living. Let’s start creating! More about me.

COME SEW WITH ME


Free Little Boxy Dress Sewing Workshop

Most Popular

  • Free Sewing Pattern: Reversible V-neck and Crewneck Shift Dress

    January 25, 2015
  • Make your own Free People inspired summer dress!

    Free Sewing Pattern & Tutorial: Free People inspired summer dress

    September 18, 2015
  • Tunic Dress: Is this the best Japanese sewing pattern maker?

    May 7, 2016

Follow @sewinlove on Instagram

  • Introducing one of our fave cities to the girls. Trams and the Japanese food have been a big hit!
  • The last stop on our Far North QLD adventure was Fitzroy Island. We did kayaking, snorkelling and went on a
  • We’ve sadly said goodbye to the incredible Daintree National Park and are heading back towards Cairns. The trip isn’t complete
  • Taking a pause and staying awhile at #capetribcamping , an awesome spot where the rainforest meets the sea. We’ve been
  • Far North Queensland really living up to its reputation now, with super sunny days and lots of wildlife! We saw
  • We picked up our campervan in Cairns and it’s been our cozy home for the last few nights. We’ve visited
  • Week 1 of our Queensland holiday: Long overdue catch up with our Brisbane fam. We made it, despite flight cancellations
  • We had friends coming, so she dusted and vacuumed. Not sure what phase of growing up this is, but I’m
  • Facebook
  • Instagram
  • Pinterest
  • Youtube
  • RSS

©2020 - Sew in Love. All Right Reserved. Sew in Love is a participant in the Amazon Services LLC Associates Program, an affiliate advertising program designed to provide a means for sites to earn advertising fees by advertising and linking to Amazon.com